An Improved Analog Clock

Sometimes all that digital stuff is just too bland.

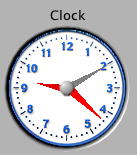
A bug undocumented feature of the original analog clock was that the markers on the scale were at intervals of 1.25 seconds, a consequence of LabVIEW preferring to use 4 intervals per major tick, when we silly humans use 5.  As a result, it looked a bit odd.  As I said then, if we’re going for an analog, then let’s go for the analog.

Attempts to coerce LabVIEW into making the scale the way we wanted were not successful; it has a long habit of thinking that four is a nice number and five is just an odd number, so I could not make it work.

So how do we improve it?  Simply disregard the built-in scale and substitute a picture.  After all, we all know where the numbers are on a clock face, if we’ve lined up the 0 and the 12 on our LabVIEW scales at the top of the circle, then all else has to fall into place.

Clock2Pic

Click here to download the example LLB file, in LV 8.0 format. It has the same math VI as before (read the previous post for details), just the clock face is different.

Enjoy.

Operations en Masse

The things that I used to do…

En masse is a French term meaning “as a whole” or “all together”; treating a group of something as a single unit.   LabVIEW has the ability to treat arrays this way, which can greatly reduce your workload. If you come to LabVIEW from a text-based language, it’s easy to miss the capabilities that are right at your fingertips.

For example, if you need to scale a series of readings into percent of the total (a procedure called normalizing),  then you tend to think:

Continue reading “Operations en Masse” »

Delays, delays, delays

Can’t you signals just work together?

Usually, in a data acquisition program,  all the signals you measure are “live”, meaning they represent the current conditions at the time they are sampled. However, in some cases you might have some signals which are not live, but delayed. For example, suppose you’re measuring engine operation, and you have gas analyzers sampling the exhaust airstream. These analyzers conduct the gas from the measurement point in the airflow system around the engine to the analyzer mechanism itself. This gas flows through the sampling tubing at a specific rate, and therefore arrives at the sample point at a specific time AFTER it left the main airstream. These delays might be multiple seconds in duration.  There could be other reasons for this delay, such as an echo-measuring device, or the mechanical response time of some piece of hardware.

For analysis purposes, you want to look at the engine holistically and see causes and effects. If the speed changed at a particular point in time, you want to see the CO concentration change as a consequence. But unless you do something to compensate, the change in gas concentration will lag far behind the change in speed that caused it in graphs and tables, making it difficult to judge consequences.

Continue reading “Delays, delays, delays” »

About Type Definitions

The types, they are a-changin’

LabVIEW beginners often either don’t know about type definitions, or don’t appreciate their value. This article will attempt to explain their use and how they can save you boatloads of time and effort.

Suppose you have a cluster of items that’s very handy to your project. For the sake of discussion, we’ll call it a channel, and assume this is a data acquisition project. A channel might have these items:

  • Channel Name
  • Active switch
  • Scale factor
  • Units

Continue reading “About Type Definitions” »

An Analog Clock (first version)

Sometimes all that digital stuff is just too bland.

If you want to display a time-of-day clock in LabVIEW, it takes three seconds to plop down a TIMESTAMP indicator, and 10 more seconds to enter ADVANCED EDITING mode, and skip the month, day and year, and format it the way you want. Piece of cake.

And it looks just exactly like every other digital clock out there: six digits, two colons, everybody knows what it means. And that’s fine for a lot of purposes.

But sometimes you like to decorate your work a little bit. If you’ve got space on a front panel, and a few cycles of execution time in your run loop, then consider an analog clock.

Continue reading “An Analog Clock (first version)” »

State of the Machine

Handle command sequences for one or a thousand devices the same way.

In dealing with external devices, there are often command sequences that require coordination between the host computer and the device. For example, a recent project of mine involved a TCP connection to (gas concentration measurement) devices which require frequent calibration (using gases of known concentration). The sequence went like this:

  1. Send CAL command
  2. Wait (about 60 sec) until END reply
  3. Chan N = 1
  4. Send request for Chan N’s ZERO result
  5. Wait on Chan N’s ZERO result
  6. Send request for Chan N’s SPAN result
  7. Wait on Chan N’s SPAN result
  8. N = N + 1. If N <= #Chans, go to 4
  9. Reset Device to standby.

That is written in what I call linear style; it assumes you have nothing else to do in the meantime. If that’s the case, then it’s well enough to implement it in exactly the above way. But that’s never the case: you have user interface issues to attend to, if nothing else. So what’s the best way to handle it?

Continue reading “State of the Machine” »

The Terminator

Make sure that quitting time is followed by happy hour.

Generally, you don’t do anything special in a LabVIEW program to quit; when it runs out of things to do, it terminates. (Quite clever, that). Your program has a loop waiting on the user to do something: when the QUIT button is clicked, the loop stops. If that is the last thing in your VI, then the VI terminates, and it’s left on the screen for you. Usually, that’s what you want; you quit because you’re ready to add the next feature, or because you decided that the purple font on the pink background was too gaudy, or because you need to find out why the temperature shows -1.33e+44 degrees.

But if you compile your program into an executable, the same thing happens (the main window hangs around), but that’s usually NOT what you want here.  The user pressed the QUIT button – why doesn’t it quit?  Most programs make their windows disappear when the user quits, and yours doesn’t do that.   You might understand that it really did quit and the window’s just hanging around waiting for you to close it, but unless you enjoy the tech support calls that result, you should consider doing something about it.


To get that window to close in an executable, you have to QUIT LABVIEW.  Find that function on the APPLICATION CONTROL palette and put it where it will execute when everything in your program is safely shut down.

The trouble is, it will ALSO quit LabVIEW when you’re in the development system.  That’s nice in the executable, as all your windows go away just like they’re supposed to. But in the development system, you don’t want to quit developing; you want to stop your program from running.

One easy way to satisfy both requirements is to use the ROOT FOLDER vi.  It has an output called NOT IN LIBRARY which connects to the QUIT? input on the QUIT LABVIEW function.  If you’re already using that VI to ascertain your root folder, then just remember the initial value of NOT IN LIBRARY.  Or call it again at quitting time; it’s small and fast.

That way, you close up the windows in an executable, but leave it ready in the development environment, and you don’t have to set conditionals, or remember to set a boolean flag in your code.  It works without change in either situation.

Where Am I?

Use a tool to find yourself.

When your program is large enough to have multiple folders to store files in, or read them from, then you have to know, or find, where those folders are.

Asking your users to create those folders will surely raise the ire of some, if not most of them. After all, the computer is capable of creating folders, the computer knows what folders are needed, why is this %!^#$^ box asking ME to do its job?

Complaining to the user about a folder not being found is in the same league; no matter how many times you print it in the instructions that they have to create the folders beforehand, folks will run your program and object to the complaint it gives them.

So, you put in things like CREATE FOLDER (”C:\MyWonderfulProgram\ConfigFiles”), and everything is all groovy, right?

Not exactly. Maybe I want to put this program on drive D:. Maybe I want to run it under OS X. Maybe I want to put it under C:\2009\March\Mediocre Programs. What do you do then?

One solution is to make all these folders relative to the root. And to do that, you have to find out where you are.

Download a Helper

I have used the following VI, for that purpose, since 1992.

Click to download Root Folder.vi

Basically, put it into a library (LLB). Call it early on when your main VI starts.
Call it with INIT = TRUE, once. When you INIT it, you can either pass the path of the calling VI (This VI’s Path) in the FILE palette, or leave the path input unwired. If you leave it unwired, it assumes that it’s in a library, and finds the path to the folder containing the library. If you provide a path, it assumes the path is to a VI in a library, and provides the path to the folder containing that library.
For our purposes, a library and an executable are the same thing, and this code works unmodified in either situation. Do not use it if it is not in a library.
After INITing it once, you can call it wherever you want to find out the root folder. You can then use BUILD PATH and create or open folders using the root folder and have them work anywhere.

Caution: Some operating systems (VISTA, in particular) will write-protect the APPLICATIONS directory, so that if the program tries to create a file or folder in that directory, it will be prevented from doing so, unless the app is run as an administrator. If you must run in that situation, consider a different method of locating the files you want to create / use.

Testimonial  Contact Info

207-593-8109

Culverson Software

184 Lakeview Drive

Rockland, ME 04841

General questions:

Sales@Culverson.com

Accounts/billing questions:

Accounts@Culverson.com


Logo